Pure Data (Pd), the powerful open-source visual programming language, offers a surprisingly accessible route to creating even the most fundamental musical tools. Among these, the metronome stands out as a perfect introductory project, demonstrating core concepts like timing, signal generation, and visual feedback within a simple, understandable framework. Its rhythmic pulse, a foundational element in music composition and performance, is surprisingly straightforward to construct within Pd's intuitive graphical environment.
This guide will walk you through the process of building your own highly customizable metronome using Pure Data's built-in objects. We’ll cover everything from generating the basic rhythmic pulse to adding visual and audio cues, allowing you to tailor your metronome to your specific needs. Let's dive into the step-by-step process and create your own digital timekeeper.
Preparation and Safety Guidelines
- Pure Data (PD)
- Pure Data (Pd) patches can become unstable if improperly wired or if objects are not used correctly. Save your work frequently to avoid losing progress.
- Understand the basic functionality of Pd objects before using them in your metronome. Incorrect object use can lead to unexpected behavior or crashes.
- Always check your audio output levels before running your patch to avoid damaging your speakers or audio interface. Start with low volume levels and gradually increase as needed.
Step-by-Step Instructions
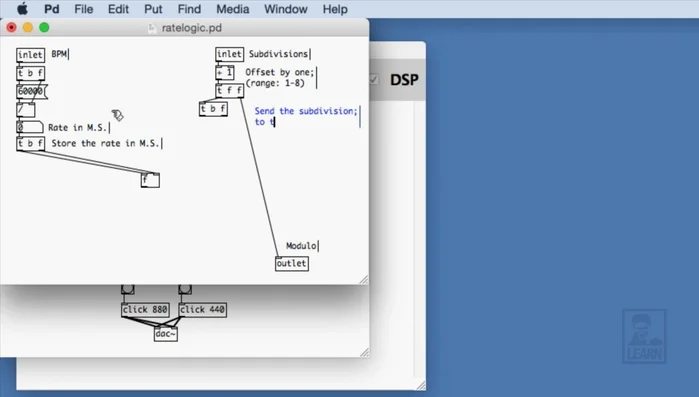
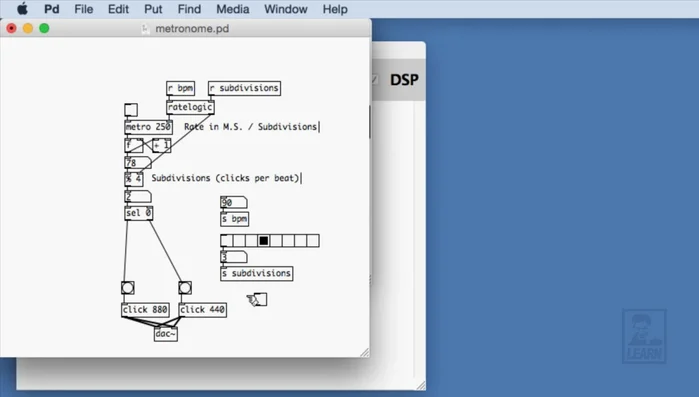
Create Rate Logic Abstraction
- Create a new patch called 'rate logic' to abstract the rate and subdivision logic.

Create Rate Logic Abstraction Convert BPM to Milliseconds
- Create an inlet for BPM (whole numbers), use the equation 60000 / BPM, store the result in a float object, and bang the output to update on BPM change.
Convert BPM to Milliseconds Implement Subdivision Logic
- Create an inlet for subdivisions (whole numbers), offset the input by 1 (to avoid division by zero), send the offset value to an outlet (for modulo in the main patch) and to a division object.
Implement Subdivision Logic Combine Rate and Subdivision Calculations
- Bang the stored float (milliseconds) into the division object along with the offset subdivisions. The output of the division is the rate in milliseconds for the metronome.
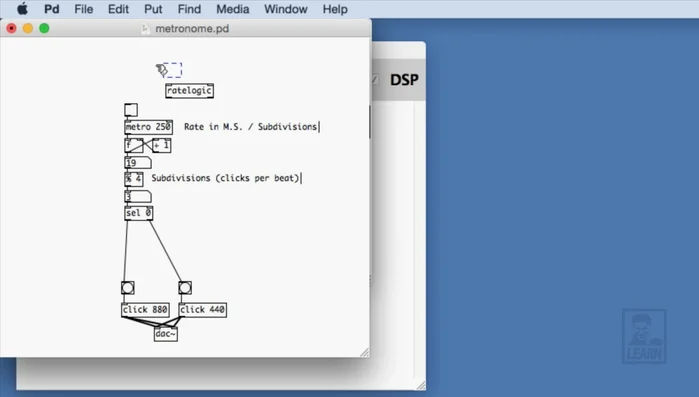
Combine Rate and Subdivision Calculations Integrate Rate Logic into Main Patch
- In the main patch, create 'rate logic' abstraction, connect BPM and subdivisions send objects to its inlets, and connect its outlets to the metronome and modulo objects.
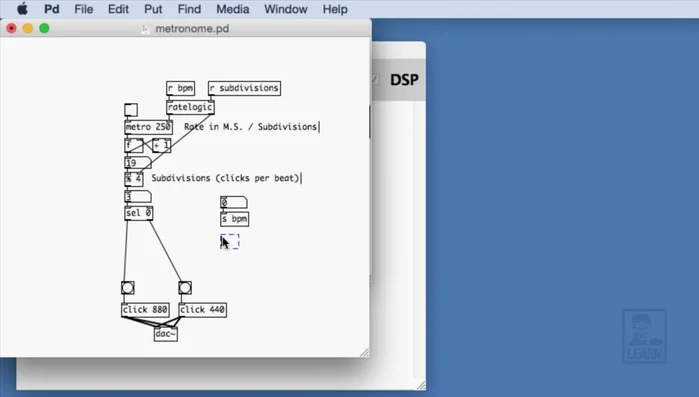
Integrate Rate Logic into Main Patch Create User Interface
- Use number atoms and a send object for BPM, an h radio for subdivisions with a send object, and a toggle for on/off control (sent to a send object).
Create User Interface Implement Metronome On/Off and Reset Functionality
- Receive the on/off message, send it to a trigger object. Use a select 0 to reset the counter by sending 0 to the float object's rightmost inlet when the metronome is turned on.
Implement Metronome On/Off and Reset Functionality


Read more: Mastering Rhythm: A Metronome-Based Exercise for Musicians
Tips
- Offsetting subdivisions by one prevents division by zero errors.
- Banging the float object ensures updates when BPM or subdivisions change.
- Using a trigger with the on/off control resets the counter, ensuring the metronome always starts with the first beat.